09/08/2024

Introduction
I recently responded to a call-out in Hull for a faulty Ideal Logic Combi boiler, where the customer reported a lack of heating and hot water, along with the display of an L2 error code.
During my visit, I successfully resolved the L2 fault, eliminated a persistent low rumbling noise from the boiler, and conducted a comprehensive service.
In this article, I'll detail the steps I took to repair the boiler, provide tips on what homeowners can check before contacting an engineer, and offer insights into better understanding this fault.
What does L2 Fault Code mean?
The L2 fault code typically indicates a problem with the ignition sequence or flame detection process. However, it's not specific to just one component and may point to issues with various parts of your boiler, such as:
Blocked condensate trap or pipework
Faulty gas valve
Damaged burner
Faulty flame sensing probe
Blocked injector
Lack of gas supply
Faulty igniter unit
Gas isolation valve turned off
The most common reason for this fault
Having attended to hundreds of L2 Faults over the years, the most common reasons for this fault, I have found are:
Blocked condensate trap due to lack of or poor servicing
Faulty igniter unit
Gas isolation valve mistakenly turned off—often when someone has attempted to adjust system pressure.
Things you can check
Unfortunately, the front case of an Ideal Logic forms part of the combustion chamber seal, and therefore it is illegal for anyone not competent to remove it. So, while the checks you can perform (if not competent) are limited, there are a few checks you can do before calling out an engineer. Over the years, I have responded to many L2 fault callouts that could have been avoided by doing these simple checks:
Check your gas supply: This may seem obvious, but it's a common culprit for the fault. If you're on a pre-payment gas meter, ensure you have sufficient credit.
Test your gas hob or oven: If they're functioning properly, you can rule out gas supply issues.
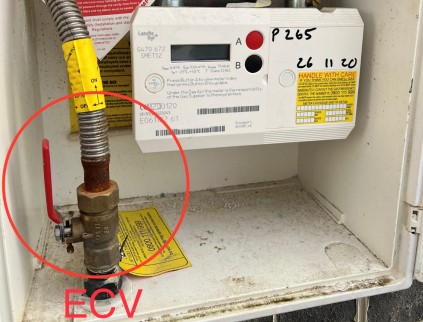
Verify the Emergency Control Valve (ECV) at your gas meter: Ensure it's open and fully open, with the handle running parallel to the valve body, like the one in the image below.
Inspect the gas isolation valve: A frequent issue I've encountered is the gas isolation tap beneath the boiler being mistakenly turned off, typically when someone has attempted to adjust the boiler pressure. Confirm that the yellow gas isolation valve is in the open position, as shown on the image below.
.jpg)
Frozen condensate pipe: During cold weather, it's essential to check if your condensate pipework is not frozen. The condensate pipe, usually a white plastic pipe beneath your boiler leading to a drain point, can freeze in chilly temperatures. Try pouring hot water over it to defrost any ice.
How I Diagnosed & Fixed the L2 Error
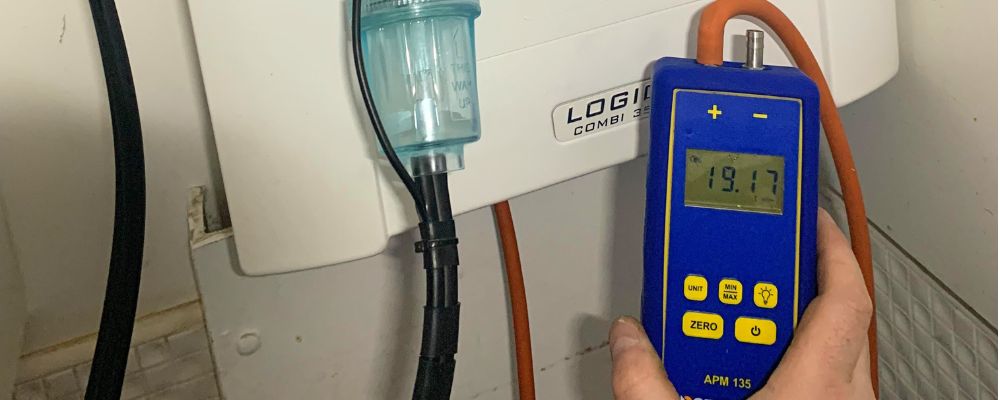
Firstly, as with any ignition fault, I began by connecting my digital manometer to the gas inlet test point to verify the gas pressures to the boiler. All readings were within normal range, eliminating a gas supply problem as the cause.
Next, I removed the case and conducted a visual inspection to identify any obvious issues such as a blocked condensate trap or visible damage to internal components.
I then ran the hot tap and observed the boiler's ignition sequence. It became apparent that the sparking sound from the igniter unit was unusually weak. To confirm this, I turned off the electrical power supply to the boiler and tested the igniter unit's integrity.
Using my multi-meter set to ohms, I tested the resistance of the inner coil by placing one probe on the neutral connection and the other on the live (pins 1 and 2). Typically, this test should yield a reading of around 2.4 kolms. However, in this instance, the igniter unit registered only 207.5 ohms. Based on this reading, I concluded that the igniter unit was indeed faulty, thus triggering the L2 fault code.
.png)
Fortunately, I always carry spare igniter units for Ideal Logic's as part of my van stock, allowing me to replace it during the same visit.
After installing the new igniter unit, I tested the boiler and found no recurrence of the L2 fault code—indicating a successful repair.
However, while the boiler was running, I noticed a low rumbling noise. Upon discussing this with the customer, they confirmed that the boiler had been making this noise for a considerable period and asked me to address it.
Identifying the Cause of a Low Rumbling Noise:
Based on my experience, a low rumbling noise coming from an Ideal Logic boiler can typically stem from one of the following issues:
Dirt accumulation on the injector
Blockage in the condensate trap or pipework
Damage to the burner
Accumulated debris inside the primary heat exchanger
Cracks in the condensate sump
A faulty gas valve
Repairing the Low Rumbling Noise:
Whenever I come up against this issue, my approach begins with a thorough visual inspection. I check for any visible dirt accumulation on the injector, cracks in the condensate sump, or blockages in the condensate trap and pipework.
If no obvious issues are found, I proceed to more intricate checks, as was the case with this particular job. I stripped down the boiler to examine the burner and heat exchanger.
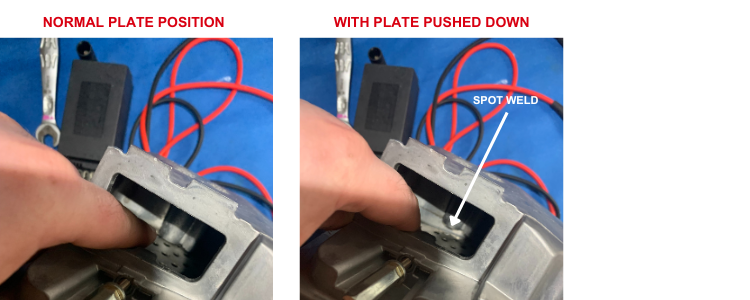
Upon removing the burner, I discovered that the plate inside had failed. Confirming this was straightforward— I simply pressed down on the plate to check for movement. Typically, it should remain fixed in place, but in this instance, it was movable due to the failure of the spot welds holding it in position. This confirmed the need for burner replacement.
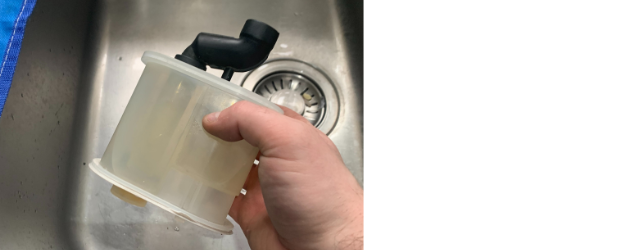
Thankfully, I also keep spare Ideal Logic burners on board my van, so I fetched one ready to be fitted. Before fitting the new burner, I thoroughly flushed the heat exchanger with water.
.png)
Following the heat exchanger cleaning, I ensured the condensate trap was free from debris left over from the flushing process.
Additionally, I wiped down the internal casing and components of the boiler to remove any accumulated dust and debris.
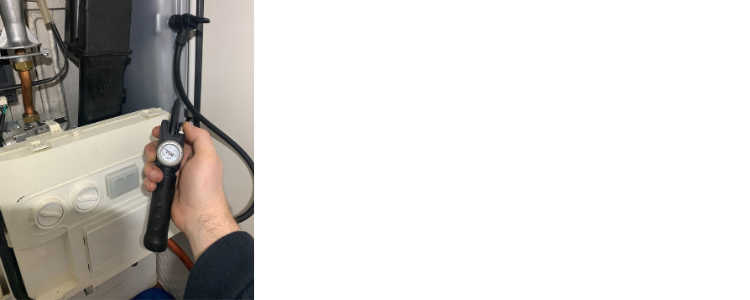
After installing the new burner and reassembling the boiler, I proceeded to drain the boiler and check the pressure of the expansion vessel, which was found to be flat. I then charged it up to 1 bar.
I make it a point to leave every boiler I work on with a fully charged expansion vessel, as I've observed this component being overlooked by many engineers. A flat expansion vessel can lead to various issues, underscoring the importance of checking it during every service.
Upon charging the expansion vessel and topping up the boiler pressure, I vented any remaining air from the system.
I then tested the boiler by opening a hot tap, and the boiler fired up without any L2 errors and operated smoothly without any low rumbling noises.
Before leaving, I carried out final gas safety checks to ensure the boiler's performance, leaving behind a satisfied customer and a well serviced boiler.
Having Issues with an L2 Fault?
If you're stuck dealing with an L2 fault code and need a hand, or with any other kind of boiler repair in Hull, East Yorkshire or North Lincolnshire, or if you would like me to carry out a comprehensive boiler service, I'm here to help. Simply book a visit online or reach out to our office on 01482 770650. We'll get things sorted out for you ASAP, making sure your boiler is back in action without any hassle.
What are common Ideal boiler fault codes?
Aside from the F1 error code, some common Ideal boiler fault codes include:
F3: Fan fault
F4: Flow thermistor issues
F5: Return thermistor problems
F6: Outside sensor error
L9: System water pressure too high
Written by : Paul Tozer